
The Complete Guide to Virtual Staging for Real Estate (2026)

Most agents still treat virtual staging as a cosmetic upgrade. It isn't. It's a listing conversion tool.

The strongest evidence comes from buyer visualization. In the National Association of REALTORS®’ 2025 Profile of Home Staging, 83% of buyers' agents said staging made it easier for buyers to visualize a property as a future home, and 49% said staging reduced time on market according to published summaries of the 2025 NAR staging data. That changes how you should think about a vacant listing. The issue usually isn't that the room is bad. The issue is that buyers can't read it quickly from a screen.
A practical virtual staging guide has to go beyond “add furniture and hope it looks nice.” The work sits in room selection, source photography, MLS disclosure, and knowing when AI staging is a smart substitute for physical staging and when it isn't. That's where most listing teams either save time and money, or create avoidable problems.
Table of Contents
- Why Virtual Staging Drives Real Estate ROI
- Comparing Physical Staging and AI Alternatives
- The End-to-End AI Staging Workflow
- Navigating MLS Disclosure and Compliance Rules
- Photography Prerequisites for Photorealistic Renders
- Common Virtual Staging Mistakes and How to Fix Them
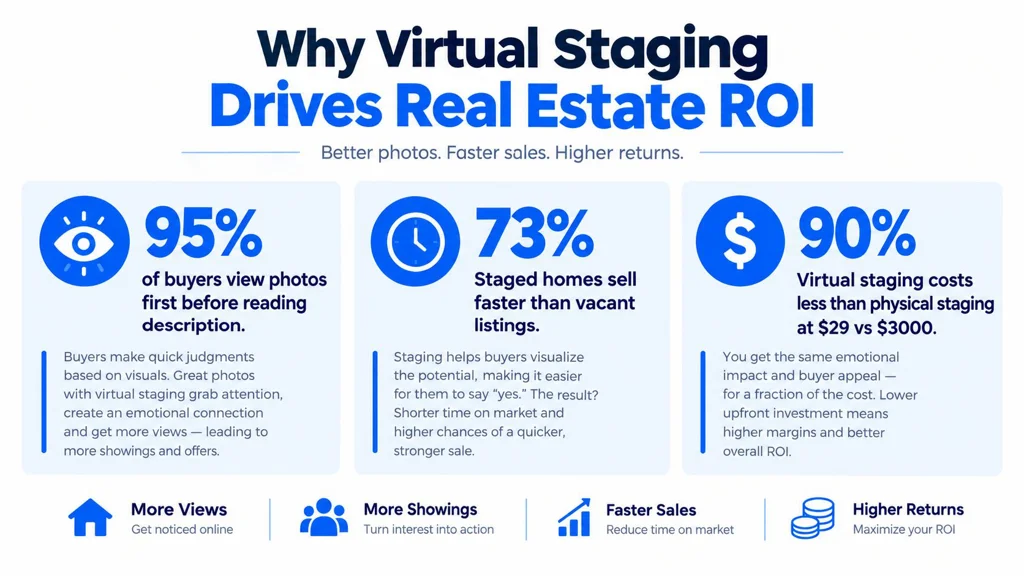
Why Virtual Staging Drives Real Estate ROI
According to the National Association of REALTORS® data summarized here, 83% of buyers' agents said staging made it easier for buyers to visualize a property as a future home, and 49% said staging reduced time on market in this NAR 2025 staging summary. That is the business case in one line. Virtual staging improves listing performance because it removes friction from the first showing buyers have, which is the photo gallery.
Empty rooms force buyers to solve too many problems at once. They have to estimate scale, guess furniture placement, and decide whether a space has a clear purpose. A strong staged image answers those questions fast enough to hold attention. A weak one creates a different problem. Buyers start wondering what else in the listing feels off.
The rooms that usually justify the spend
Room selection is where ROI is won or wasted.
Earlier NAR figures noted that living rooms, primary bedrooms, and dining areas are staged most often. In practice, that tracks with buyer behavior. These are the rooms that help people read daily life in the home and judge whether the layout works for them. A vacant living room usually deserves attention before a secondary bedroom, office nook, or bonus space because it carries more weight in both thumbnail clicks and buyer memory after the tour.
The operational mistake is treating every room as equal. They are not. If the budget only covers two or three renders, use them on the spaces that answer the biggest buyer questions: where people gather, where they sleep, and whether the floor plan feels functional. For some listings, that third room is the dining area. For others, it is the awkward flex room that buyers keep misreading online.
A simple priority order works well:
-
The room that anchors the listing photos
-
The room that proves everyday livability
-
The room that clears up layout confusion
What actually creates ROI
The return shows up in listing operations before it shows up in final sale numbers. Better images usually improve click quality, reduce low-intent showings, and cut down on the seller calls that start with, "We have views, so why are buyers not booking?"
That only happens when the render is believable and properly disclosed. Photorealism affects trust. MLS compliance affects risk. Both matter just as much as style.
I have seen teams burn their staging budget on six edited images for low-priority rooms, then leave the main living area vacant because they ran out of time or money. That is backwards. One accurate, well-lit, well-disclosed staged hero image often does more work than a full set of mediocre renders.
Cost discipline matters too. Sellers usually respond well when staging is framed as a marketing line item with a defined job, not as decor. If you need numbers for that conversation, this breakdown of virtual staging costs gives a practical pricing baseline.
Poor execution kills the return fast. Oversized furniture, styles that ignore the home's architecture, inconsistent shadows, and undisclosed edits do more than look amateur. They lower confidence in the listing, and once buyers stop trusting the photos, every other marketing advantage gets weaker.
Comparing Physical Staging and AI Alternatives
According to the NAR 2025 Profile of Home Staging, professional staging still carries a meaningful cost gap against digital alternatives. That gap is why agents keep asking the wrong question. The choice is rarely "physical or virtual." The question is which method solves the listing problem with the least operational drag and the lowest compliance risk.
Physical staging changes the in-person experience of the property. AI staging changes the marketing package. Those are related jobs, but they are not the same job.
Physical vs Virtual Staging Economics
| Feature | Physical Staging | AI Virtual Staging |
|---|---|---|
| Typical cost structure | Furniture rental, delivery, setup, removal | Per-photo digital rendering |
| Reported pricing | Median about $1,500 for professional staging, and around $500 when agent-staged, per the NAR 2025 Profile | Commonly about $24 to $99 per photo, with some industry summaries reporting pricing as low as $29 per photo |
| Speed | Usually tied to vendor scheduling, setup, and removal | Often finished the same day once final photography is ready, per the NAR 2025 Profile |
| Access requirements | Requires property access and physical logistics | Works from completed photography |
| Best fit | High-touch showings, premium in-person presentation | Vacant homes, remote sellers, rapid listing workflows |
That spread matters, but speed and coordination matter just as much.
A vacant listing that misses its photo deadline by three days because the stager, photographer, and installer could not align often loses more momentum than agents expect. AI staging cuts out most of that coordination. No delivery window, no setup crew, no pickup appointment, and no risk that a seller cancels access after furniture is already booked.
When physical staging still wins
Physical staging still earns its budget in a few clear cases:
-
Luxury listings with heavy in-person traffic. Buyers in that segment often respond to scale, texture, and flow during private showings.
-
Builder models and new development sales centers. Repeated walk-through traffic justifies the upfront install.
-
Rooms that feel cold or awkward in person. If the actual showing experience needs help, digital edits only fix the listing photos.
There is also a seller-management angle here. Some sellers equate visible furniture with visible effort. If that expectation affects the relationship or the listing presentation, physical staging can be the smoother choice even when digital would be cheaper.
When AI staging is the practical call
AI staging works best when the business problem is speed, clarity, and cost control.
Vacant condos are a common example. So are rental turnovers, estate sales, investor flips, and listings where the owner lives out of state. In those cases, the goal is usually to publish clean, believable images fast, then disclose the edits correctly and move on.
The trade-off is quality control. Cheap AI staging saves money only if someone on the team can reject bad outputs. That means checking scale, shadow direction, window lines, furniture placement, and whether the style fits the house. A fast render with a giant sofa blocking a patio slider creates more cleanup work than it saves.
Analysts in this virtual staging ROI study reported stronger click-through rates, lower days on market, and better cost efficiency for AI-staged listings than for traditionally staged ones. I would not use those numbers as a blanket promise across every market, but the operational point holds. AI staging is often the better fit when the listing needs polished visuals faster than a physical staging schedule can deliver.
If your team is comparing tools rather than hiring a stager, this guide to virtual staging software for real estate teams is a useful starting point.
The best listing workflows use physical staging for experience and AI staging for speed. The mistake is treating them as style choices instead of production decisions.
The End-to-End AI Staging Workflow
Listings with staged images often win the first battle before a showing is ever scheduled. The operational problem is that fast AI output only helps if the team can produce believable images, keep the file history straight for MLS disclosure, and avoid wasting time on rooms that will not change buyer response.
Good virtual staging runs like a post-production system. The image is selected, the room is classified correctly, the prompt settings are kept tight, and every render gets a review before it reaches the listing folder. That process is consistent with the workflow described in this digital images and virtual staging support reference.

The first decision is not style. It is room priority.
In practice, the highest-return images are usually the living room, primary bedroom, and the main open kitchen or dining area. Spare rooms, bonus rooms, and awkward flex spaces come later unless the marketing angle depends on them. Teams that stage every photo often spend money on low-impact images while skipping the rooms buyers use to judge scale, layout, and livability.
Start with the clean final photo from the original shoot. Do not use a screenshot, a brochure export, or an MLS-compressed file. The model needs intact edges, window lines, floor texture, and enough detail to read the architecture. If your team needs a reference point for setup and editing order, this virtual home staging walkthrough shows the basic sequence.
Next, choose the room type with care. This is one of the easiest places to create amateur-looking output. If a narrow breakfast area is tagged as a formal dining room, the render may force in a table that blocks the path to the patio door. If a den is tagged as a bedroom, you often get a floating bed wall, crushed circulation, or nightstands pasted over floor vents. Those are not cosmetic misses. They signal to buyers that the image is fake.
After room type, set the furniture style and lighting treatment to match the house and likely buyer profile. A downtown condo can usually carry cleaner lines and lighter contrast. A suburban traditional home often needs warmer materials and less aggressive styling. Lighting presets matter too. Keeping original light usually preserves realism, while brighter or warmer settings can help only if the shadows, window exposure, and fixture logic still fit the base photo, all described in the same support workflow reference.
Object removal comes next, and teams lose time if they get careless. Remove leftover furniture, dated décor, or obvious clutter when those items interfere with the new layout. Leave the room alone if it is already empty or close to empty. Every unnecessary removal pass increases the chance of damaged baseboards, smeared trim, warped floorboards, or patched corners that need a second round of cleanup.
Generation itself is fast. The slower part is approval.
I treat the first render as a draft, not a deliverable. That habit prevents a common workflow mistake: downloading a decent-looking image on a phone screen, then discovering on desktop that the sofa leg is missing, the rug runs through the fireplace hearth, or the window muntins have bent around a lamp.
Use a short QA pass before export:
-
Check scale and clearance. Buyers notice when beds are oversized, dining chairs block walkways, or a sectional leaves no path to a door.
-
Check contact points. Furniture should sit on the floor naturally, with believable shadows and no hovering edges.
-
Check architectural integrity. Vents, outlets, casing lines, stair rails, and fireplace edges should stay sharp.
-
Check style continuity. The staged room should fit the home's price point and the rest of the photo set.
-
Check disclosure handling. Save the original image, label the altered version clearly in your production folder, and keep both ready for MLS compliance.
Edits and rerenders solve different problems. Minor defects such as a distorted lamp, a soft rug edge, or a weak shadow can usually be fixed in editing. Wrong room logic, wrong furniture density, or the wrong buyer style usually calls for a full regeneration. That is the difference between a smooth listing workflow and a team that burns twenty minutes trying to repair an image that should have been restarted from step two.
Navigating MLS Disclosure and Compliance Rules
A lot of virtual staging guides spend pages on style presets and almost none on disclosure. That's backwards. Compliance is where agents get exposed.
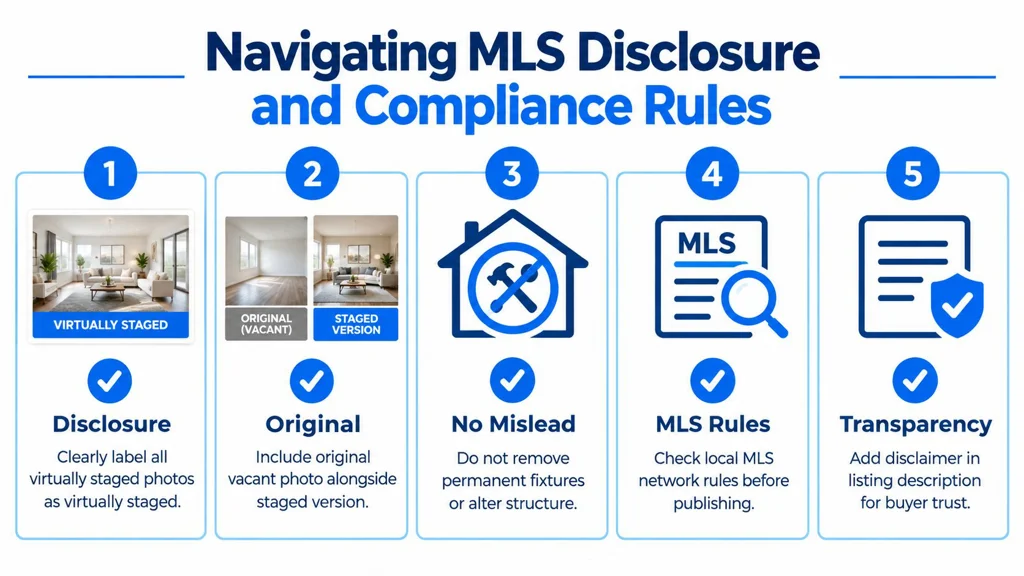
The safe assumption is simple. If an image has been materially altered for marketing, label it clearly and follow your MLS rules exactly. Don't rely on “buyers will figure it out.” They won't, and that's not the standard anyway.
What disclosure looks like in practice
Independent guidance now says altered listing images should be clearly labeled and, in some cases, paired with an unaltered before image. North Star MLS states that every virtually staged or AI-enhanced image should be identified in the caption, on the photo, or in agent or public remarks, and should include at least one true-condition image for each affected area in these North Star MLS virtual staging and AI photo guidelines.
That's more specific than many agents expect. It also reflects where the industry is heading. Rules are getting tighter, not looser.
The line you shouldn't cross
Furniture staging is one thing. Misrepresentation is another.
Acceptable edits usually include adding furniture to an empty room, light decluttering where local rules permit it, and cosmetic presentation edits that don't change the actual condition or layout of the property. Risky edits include removing permanent fixtures, disguising damage, changing finishes without disclosure, altering views, or creating a room function that the actual space can't support.
A plain-English compliance checklist helps:
-
Label every altered image: Put “virtually staged” where your MLS requires it.
-
Keep at least one true-condition image: If the room is staged digitally, keep one version available where required.
-
Don't alter structure: No removing walls, windows, columns, or built-ins.
-
Separate enhancement from deception: Exposure correction is not the same as fabricating condition.
-
Check local rules every time: MLS policy is local, not universal.
Compliance habit: Build disclosure into your upload checklist, not your memory.
Why field-specific rules matter
Some MLS systems don't just require general disclosure. They specify exactly where it has to appear. In one current MLS workflow, virtually staged photos must be identified in the photo-description field by adding the words “Virtually staged,” checking a dedicated staged-photo field, and placing “One or more photo(s) was virtually staged” at the start of the public remarks, according to these Stellar MLS rules for virtually staged photos.
That kind of field-level requirement is easy to miss if your team treats disclosure as an afterthought. For a broader agent-facing explanation of the category and where it fits in listing prep, this virtual staging guide for real estate agents is worth bookmarking.
Photography Prerequisites for Photorealistic Renders
AI staging can improve a strong source image. It can't rescue a bad one.
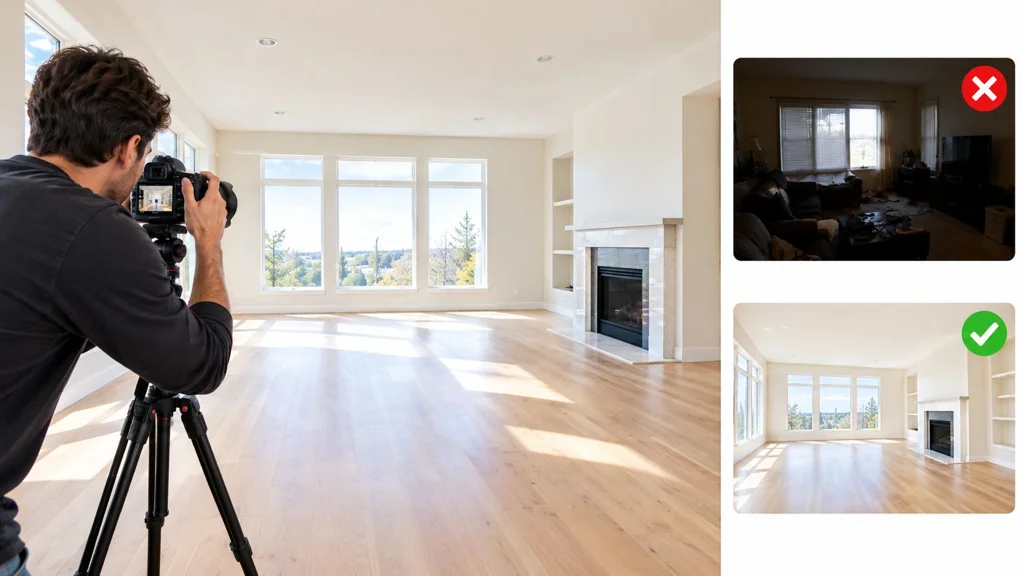
When staged photos look fake, the software often gets blamed first. In practice, the failure usually starts earlier with the photography. Crooked verticals, crushed shadows, low resolution, bad white balance, or a room shot from a corner that hides half the usable floor all make the staging engine work harder than it should.
What the camera needs to capture clearly
A staging model needs the room's geometry to stay readable. That means visible floor area, full wall boundaries where possible, straight vertical lines, and enough dynamic range to preserve the relationship between windows, walls, and shadow areas.
These habits help more than any post-fix:
-
Keep verticals straight: If door frames lean, furniture placement will often feel wrong even when the render is technically clean.
-
Expose for the room first: Window views matter, but interior readability matters more for staging.
-
Show usable floor: The AI needs open placement area to interpret traffic flow and scale.
-
Use a consistent height: Wildly high or low camera positions distort proportions and make furniture look off.
-
Avoid motion blur and compression: Soft edges make object boundaries less reliable.
Why empty is usually better than half-cleared
Half-empty rooms are harder than vacant rooms. A few leftover items can confuse placement and create weird compromises. If the room still contains dated furniture, either remove it physically before the shoot or use a clean removal step before staging. Don't leave a random folding chair, lamp, or plastic storage bin in the frame and expect polished results.
That's also where image prep tools help. Brightness correction, perspective cleanup, and general listing-photo polish should happen before staging if the source file needs work. A dedicated real estate image enhancement workflow can make the base image more usable before any furnishing decisions happen.
The design side of realism
Photorealism isn't only technical. It's also editorial. A sharp image with bad staging still looks amateur.
The strongest renders respect the architecture already in the room. If the home has compact rooms and low ceilings, don't force oversized luxury furniture. If the property reads as warm traditional, don't fill it with ultra-minimal showroom pieces that fight the trim, flooring, or window style.
A reliable pre-staging checklist looks like this:
| Checkpoint | What to confirm |
|---|---|
| Perspective | Walls and vertical lines look natural |
| Exposure | Interior details are visible without muddy corners |
| Resolution | The file holds up for MLS and marketing use |
| Room clarity | The room function is obvious from the angle |
| Style fit | Planned furnishing matches architecture and buyer profile |
Good virtual staging starts with honest photography. The AI can furnish the room, but it still needs a room that reads clearly.
Common Virtual Staging Mistakes and How to Fix Them
Publishing the first render without checking floor contact, scale, and MLS disclosure language is one of the quickest ways to make a staged listing look careless. Buyers may not know why an image feels off, but they spot visual errors fast, and compliance mistakes create a separate problem for the listing team.
Mistake one: staging the wrong rooms
A lot of weak virtual staging starts with poor room selection, not poor rendering. Teams stage the vacant rooms that are easiest to process instead of the rooms buyers use to judge value, layout, and livability.
Stage based on buyer decision points. In practice, that usually means the main living area, primary bedroom, and any room that clears up an awkward floor plan or undefined use. A flex room, loft, or finished basement can deserve priority if buyers are likely to ask, "What goes here?" A secondary guest room usually does not.
This choice affects ROI more than people expect.
One strong image that explains how the home lives will usually do more work than three staged filler rooms at the back of the gallery.
Mistake two: furniture that fights the house
Style mismatch is still one of the easiest tells. Clean contemporary furniture can work well in a newer condo, but it often looks wrong in a traditional home with heavy trim, warmer flooring, and smaller room proportions. The reverse is also true. Overstuffed furniture in a sleek modern interior makes the room feel dated.
The fix is simple, but it takes discipline. Match the furniture profile, materials, and color temperature to the house itself and to the buyer segment you expect. A starter condo, a move-up suburban house, and a luxury downsizer property should not all get the same furniture set.
Mistake three: bad scale, bad placement, bad shadows
Amateur AI edits fall apart. The room may look attractive at first glance, then the details start failing. A bed headboard covers too much wall. A dining chair leg floats. The sofa angle ignores the camera perspective. Window light falls left to right, but the lamp shadows run the opposite direction.
Review the image like an operator, not a spectator:
-
Check floor contact: Every leg, rug edge, and furniture base should sit naturally on the floor.
-
Check scale: Beds, sectionals, and tables need to fit the actual footprint and leave believable circulation space.
-
Check perspective: Furniture lines should follow the room angle and lens position.
-
Check light direction: Shadows and highlights should agree with the existing window light.
-
Check repetition: AI often duplicates pillows, chairs, or decor in ways a human notices immediately.
If the concept is right but one object is wrong, edit that object. If the geometry is off across the whole room, regenerate the scene instead of trying to patch it.
Mistake four: solving every problem in one image
Some teams ask the staged render to do too much. They try to furnish the room, redesign it, brighten it dramatically, replace what is visible through the windows, smooth every surface, and hide underlying photo problems in one pass. The result looks processed because it is processed.
Separate the jobs. Use a clean base photo. Stage the room. Then review realism at normal listing size and full-screen size. If the image starts calling attention to the edit, it has gone too far.
Mistake five: skipping disclosure and final compliance review
This mistake does not just hurt credibility. It can create MLS issues that are easy to avoid.
Virtual staging needs a final publishing check that covers both realism and disclosure. The image should be labeled according to local MLS rules and brokerage policy, and the staged version should not misrepresent permanent features, views, finishes, or room dimensions. Adding furniture is one thing. Hiding damage, changing flooring, removing built-ins, or altering the apparent condition of the property crosses into a different category.
Use a short pre-upload review:
-
Does the staging clarify how the room functions?
-
Would the furniture arrangement fit in real life?
-
Do scale, contact points, and shadows hold up under close review?
-
Could a buyer feel misled when they visit in person?
-
Is the disclosure language correct for this MLS and this image set?
If one answer is no, hold the image and fix it before it reaches the listing feed.
RoomStaging gives agents, photographers, and listing teams a practical way to turn clean property photos into photorealistic staged images, with editing, regeneration, furniture removal, and high-resolution exports built into the workflow. If you want to put the ideas in this virtual staging guide into an actual listing process, explore the virtual staging feature or visit RoomStaging and test it on a vacant room before your next launch.